In 2009, when winter just seemed to be dragging on forever, we decided to build a cold frame for our beloved salad table so that we could extend our growing season just a bit. We’ve actually had lamb’s lettuce and spinach growing (oh so slowly) in there all winter. The regular baby lettuces that we use as a cutting mix found it a bit too harsh in there but the others are quite hearty for the winter months. There were a few times that they wilted a bit but once the temperatures were out of the negatives again, they perked right back up.
This will be our third summer with this salad table and I have to say it is still one of the smartest things we’ve ever built. You can almost watch the lettuce growing in the spring and fall (when the sun isn’t just scorching the lettuce plants) and it’s done pretty well for basil, cilantro and parsley as well.
Because the bottom of the table is still open, you do lose a lot of heat, and there’s no real insulation even with this topper. But it will at least allow you to keep growing things late into November or maybe even December. And we are thinking of using it as a seed incubator after we’ve gotten the sprouting going inside the house since our greenhouse is still in major need of renovation.
You could use this same construction idea to make cold frames that sit on the ground around your garden. It will help keep the ground warmer so you can start planting vegetables a bit earlier this spring, without the risk of frost.
We had a substantial stack of Plexiglas here at the farm which was left behind from the previous owner. So this was a great project to use up some of it.
We shot a couple of videos for you, staring Stefan that detail the process we went through. So I hope you’ll check them out below. I’ve also written out the instructions for you below. Sorry but you’ll have to refer to the video for most of the photos since we weren’t doing both while making this cold frame — but it’s a very simple construction so I think you’ll get the gist of it.
How to Build a Cold Frame – Part 1
How to Build a Cold Frame – Part 2
Building a Cold Frame
Tools Needed
- Router
- Miter saw
- Electric drill with drill bits
- Cordless screwdriver
- Angle
- Level
- Measuring stick or tape
Materials List
- Eight 2-meter-long 1×2″ wood beams, untreated
- screws
- Plexiglas
- Handle
How to Do It
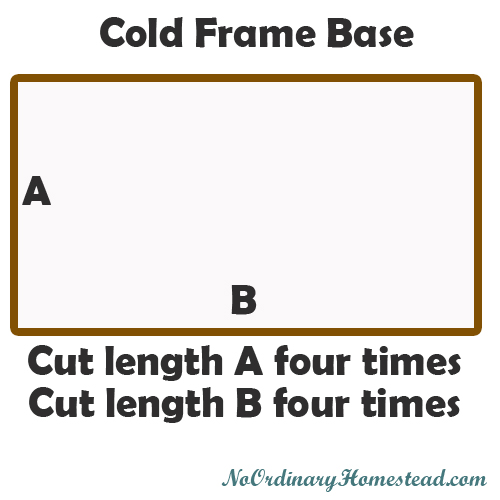
- Measure how deep the cold frame will be (length A on diagram). Measure out this distance (in our case 76 cm) and mark it on one board. Cut it with the miter saw. Use this first piece as a guide for your second cut which goes on the other side of the table.

- Lay these boards on the table, lined up with the table pieces running underneath, and lay a beam across the front of the salad table, to get the width measurement (length B). Make sure the corners are lined up. Mark the board with the measurement.
- Cut all the lengths of A & B that you need to complete the table. Eight lengths of A total and 6 lengths of B. Remember you need twice the base diagram above because you need a complete outer cold frame shell. And then you assemble the lid to go on top using the same lengths.

- Cut 4 short beams (ours are about a foot but if you want to grow taller vegetables in this, you can go with something higher) for the corners.
- You will need to use your router and route one thin side, the full length of each A & B piece…and create two A pieces which have both sides routed for the lid. The groove should be wide enough for the Plexiglas to side into but not so wide that it falls out. This will keep it in place as well as hide any slightly jagged edges.
- Now it’s time to start assembling. Since it will only tend to confuse if I try to describe the process, I suggest watching part 1 of the videos above, starting at about the 5 minute mark.
- Oh, and there will be a few more short pieces to cut for the base which hold the Plexiglas in place. Woops.
- How to score and break Plexiglas is shown in part 2, starting at about 1:25.
Feel free to ask questions, contribute comments or ask for clarification.
If you would really like to have a full written explanation of how to build a cold frame, let me know and I will put it together. Unfortunately, it took me over a year to actually put this much of the process together (you might here the baby in the background which is our little Mackenzie, now 2 1/2 years old!) so I really just want to share this finally, considering that garden season is fast approaching and we really love both our salad table and the topper!!


Trackbacks/Pingbacks