
Garden Life is a day early this week for several reasons. One is that it’s Thanksgiving and two is that Mackenzie is turning 3 tomorrow. So my Friday is going to be SUPER busy as I prepare for our turkey dinner on Saturday and celebrate a bit with our little girl. Hence the change. Next week, it will be back to the regularly scheduled programming.
Earlier today, I shared how to make your very own pumpkin puree. It’s a very easy process and you are left with the very tasty and healthy (especially for men) by-product of pumpkin seeds. I have to admit that I’d never really eaten too many pumpkin seeds until we started on our low-carb diet. I was looking for something which I could snack on that would give me protein without a ton of carbs, and a bag of mixed nuts became my friend during afternoon hunger pangs.
Roasting pumpkin seeds is a very easy process, and although you don’t necessarily end up with a huge yield from small pie pumpkins, it’s totally worth it. And a lot of fun to do with kids. You can roast seeds from just about any sort of pumpkin as well as many larger squash versions like turban squash (which have firmer seeds).
To me, roasted pumpkin seeds (sometimes also called pepitas) using this recipe taste a lot like popcorn. So if you’ve never had them and are wondering what the big deal is, that’s what’s up. Pumpkin seeds without their lighter colored hull are usually green, but with this method, you can usually eat the whole seed pod without shelling (which is wonderfully convenient). Some larger pumpkin seeds will need a longer cooking time or you’ll end up with very chewy, rather inedible seeds with seed coats that are impossible to remove.

There are a few ways of roasting pumpkin seeds, but the method I’m going to describe leaves the seeds with a lightly salted taste and a wonderfully crunchy, puffy texture. You really need to be careful when roasting them, though, because if you leave them in a few minutes too long, you’ll end up with seeds that taste (and smell) like burnt popcorn. And I don’t know about you, but that’s certainly not one of my favorite things to eat.

The basic process is very simple and looks a bit like this…
First, you want to scoop out all of the seeds and put them into a bowl. I have these in a strainer, but you really don’t need to wash them or anything.

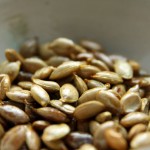
Then you’ll need to go about separating the pulp from the developed seeds. I say developed because you’ll also probably have a lot of soft, small seeds in the pulp which can be roasted, but turn into something more like puffed rice. In the picture below you can see the really large seed in the middle, and the small seed to the left of it which is lighter in color. When you have them in your hands, you’ll notice that the undeveloped seeds are basically just seed coats with no green seed inside.

Once you’ve got your seeds collected, you want to quickly measure them before simmering them for about 10 minutes. You measure them to determine how much water and salt to cook them in (which I’ll detail in the recipe below).

After boiling, you’ll roast the seeds in the oven for 10 – 20 minutes (small pumpkin seeds are on the 10 minute side) and then they’re ready to eat!
PrintRoasting Pumpkin Seeds
Ingredients
- 1/2 cup fresh pumpkin seeds, rinsed
- 2 cups water
- 1/2 teaspoon salt
- Olive oil
Instructions
- Preheat oven to 400°F (200°C).
- In a small saucepan, add water, salt and seeds. Bring to a boil, then simmer for 10 minutes.
- Remove from heat and drain.
- Lightly coat the bottom of a roasting pan with olive oil. Spread the seeds out in a single layer across the pan. Bake on the middle rack until the seeds begin to brown (and start smelling a bit like popcorn), about 10-20 minutes.
- Remove from oven and let cool completely before eating. Crack to remove inner seed or eat whole.
- Store in an open bowl on your kitchen counter (until they are devoured). This will ensure they maintain their crunch.
Want to join in the garden fun and link to your own blog or images online? You can link any of your posts that are related to gardening (either old or new) from recipes to harvesting to grow reports to DIY projects or inspiration.
Here’s how this works:
PLEASE READ THESE GUIDELINES, especially if you have never linked up before!
|
That’s it! Share your garden with us by linking up below!

I would love to link up. All the other gardening linkies I participate in close during the winter, and here in Texas we can still garden in winter!
But I don’t see the linky. I added your button to my post anyways. It’s at…
http://texifornia.blogspot.com/2011/11/i-love-texas-fall-gardening.html