 Long-time NOH readers will find it no surprise that we have begun really enjoying to make wine over the last 3 or 4 years. It’s not something I’ve really talked a lot about because it’s a rather involved process, and we were really still trying to learn what everything is and what it’s for. But I know that a lot of people have expressed an interest, so I thought it would be fun to put together a collection of Winemaking 101 posts.
Whenever we have a large batch of berries or even some other fruits, we consider making it into wine. Not just anything can be made into a decent wine, but we’ve been lucky to have good yields of certain things that are compatible. And it’s not that we drink all that much, but it sure is fun to do and if it turns out well, you can always give it away as presents.
In previous years, we’ve made apple wine, a gooseberry dessert wine and a few other fruit wines that turned into big fails. But this was the year when our red grapes FINALLY did not turn all moldy and gross — in fact we had a stellar harvest and will end up with about 30 liters of red wine. And it is also the year that I discovered our friends have huge batch of Riesling grapes growing in their garden, which they do absolutely nothing with. So next year, we’ll be looking forward to drinking some of our own whites (at least 3 months resting period) and reds (at least a year to wait).
But before I go off on a tangent about how to make some of the particular wines we’ve done, I figured it would first be prudent to actually show you the tools needed to get started with wine making. The Intro to Winemaking 101 if you will.
There are a quite a few tools and things one needs. Here in Germany, you can sometimes find people getting rid of their entire collection of wine balloons, press, corker, whatevers all at once. It’s often because someone is now too old to make the wine or younger people realized they really had no interest in the first place. So we have quite a collection of wine balloons and fermentation barrels which came with our house, from about 5 liters to around 50. And we have bought a lot of other things new because we had no other choice.
The items you use for wine making may look slightly different, and the investment cost can vary greatly since you may be able to pick up some things used — although do be careful about asking what it might have been used for in the past — you don’t want to age a wine in something that used to hold chemicals. The good news is that most of it lasts roughly forever, unless you happy to crack a glass balloon (which so far has only happened to us once – *knocking on wood*).
For starters, you are going to need some sort of fermentation barrels, glass jars and balloons. For the must at the beginning (the very first stage of fermentation), it’ s best to have something dark in color so that what is inside doesn’t start to react or mold due to the light. The black barrel you see below is a just that, and it has a two part lid. The first piece is flat and fits snugly onto the barrel. The second is a tightening ring that screws on. If you’re familiar with canning in Ball jars, it’s very much like that — just way bigger and plastic.
You crush your fruit as you dump it in there, add some anti-gelling powder (which helps the fruit break down so the juices can be released) and then let it work through the first phase. The time frame differs based on the type of fruit or grapes used. You may also want a Hydrometer or Öchsle scale and tall, narrow beaker at this stage to check the sugar levels in the fruit, but we rarely get that scientific about it.

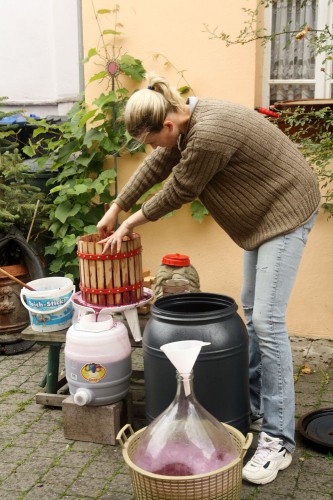
Now you will want to press the wine. In addition to the wine press, you’re going to need a funnel, a wine balloon or barrel (these can be clear), something to scoop the fermented fruit out of the barrel and into the press, a bucket to throw the pressed skins into (we usually toss this right into the compost bin) and a staggered working space to make this all function smoothly.
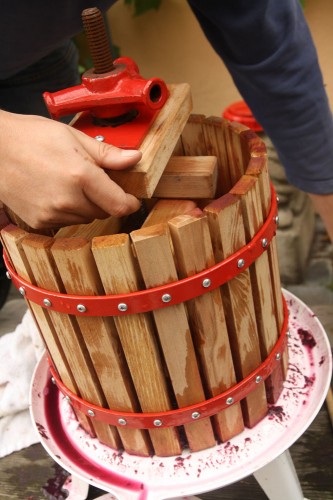
The wine press allows you to get all of the juice out of your grapes or fruit without having to stomp on it. When it comes to presses, bigger is almost always better. In our experience, our press gets the job done at about 10 liters per pressing. That may not sound too bad — but when you’re pressing 30, 50 or even 100 liters or wine, it becomes tedious. And you want the process to move as quickly as possible to keep fruit flies and other bugs out. Any contamination will take your wine to vinegar — or just nothing useful at all.

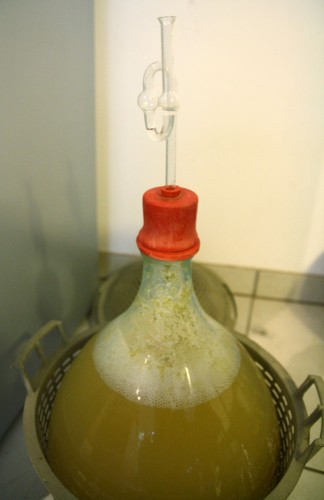
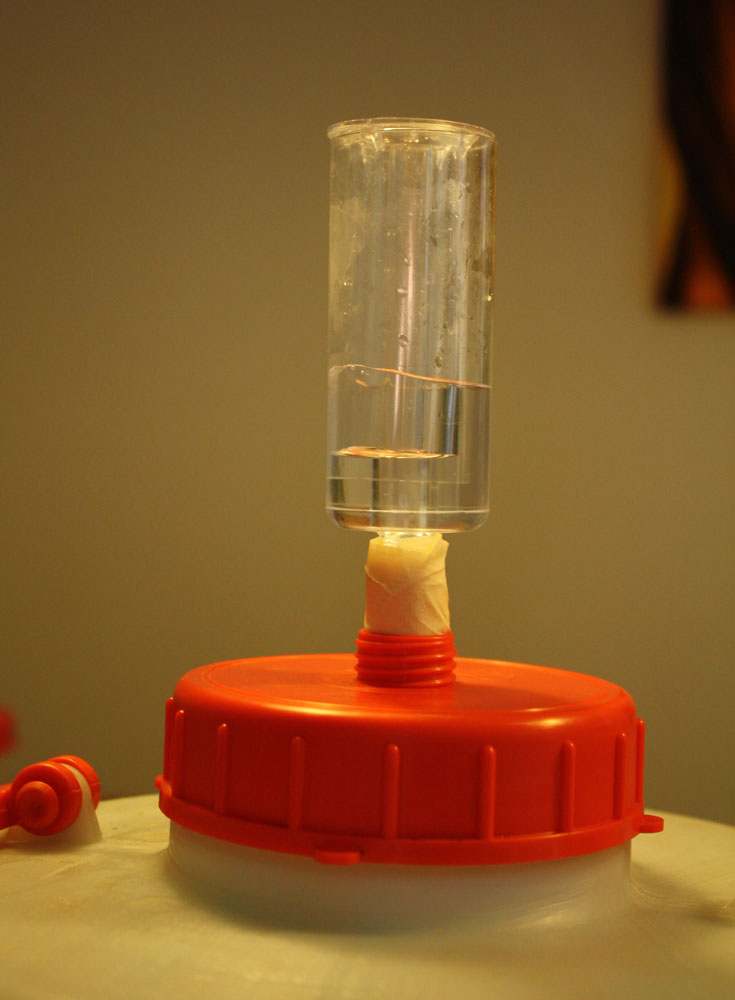
Once you’ve pressed the wine, you will let it sit again and the sediment inside will settle. The next most important thing in winemaking 101 is a fermentation bell. This is basically an airlock that sits on top of your fermentation container and allows the air created during the fermentation process to escape, but keeps bugs and other creatures from getting. This gives you a bit of peace of mind that the work you are doing to make wine will achieve good results. You can use some cotton stuffed into the top of your container or cover it with plastic. But in our experience, the plastic wrap gets holes poked in it by tiny fingers, and the cotton may also fall into the container — and if you don’t notice soon enough, your whole batch could be ruined.

Our recent batch of white wine which was especially active during the initial phases, hence all the foam.
As you’ll notice, we also have some rubber nipples that fit over our wine balloons (when we’re lucky), and there is a hole in top for the bell. Fermentation bells may be glass or plastic, but they function in much the same way. The problem we’ve had with the plastic ones is that the two pieces tend to get separated or opened by tiny hands (winemaking with a toddler or younger is quite an experience) and then your wine is again at risk.

Once you’ve let everything settle for the first go round, you’re going to need to pull out the funnel again, grab another balloon or jug and find a siphon. You need to siphon off the wine from the sediment, because if you leave the wine together with the impurities too long, it will start to taste bitter. So the key is to disturb the wine as little as possible when you move it — and not dip the siphon down too far into the wine so the yucky stuff stays put.
You will also need a funnel here and some sort of filter. This could be a cheese cloth, a fruit sieve, muslin cloth, coffee filters — whatever you have that will keep the sediment, seeds and other things from going back into your wine.
You put the wine back into a big balloon, add your chemicals (which could be yeasts, tannins, acids or other things) and let the fermentation continue. Usually you want the whole batch to fit in one container, with just a bit of space at the top so the wine has space to work. Some may want to try to skip the chemicals, but you will end up with a better quality wine if you just buy them and use them. And you really don’t need so many things. The yeast is probably the most important — so if you only go for one thing, get that. Although we have had wine made without any chemicals (and it’s fantastic) an inexperienced winemaker is likely going to have trouble getting the results they want at first without these helpers.
After the wine has worked and is read for bottling. You will need empty wine bottles and some sort of lids. You can get screw-ons or corks from plastic, real cork or even glass. In the instance of the first two corks, you’ll probably also want a corking gun to make the process go much more smoothly. Another option is using plastic bag in a box packaging. We were able to find a supplier for them here in Germany and we often use them for fruit juices we make and pasteurize before bagging. We haven’t used them for wine since we only have 3- and 5-liter bags — but I’m sure one could if you drink large quantities of wine within a few weeks time.
So there you have it — the basic tools of Winemaking 101. Hopefully you’ve learned something new and interesting…and I’m looking forward to sharing more about our wine experiences with you in the coming weeks!
Have you ever made your own wine? How did it go?
If you’re just learning about this for the first time, what questions do you have that you’d love answered?
Want to join in the garden fun and link to your own blog or images online? You can share about anything related to gardening, old or new posts, from recipes to harvesting to grow reports to DIY projects or inspiration.
Here’s how this works:
PLEASE READ THESE GUIDELINES, especially if you have never linked up before!
|
That’s it! Share your garden with us by linking up below!


I have a friend who lives in France and is always posting (on Facebook) about all the different fruit wines she makes from the fruit she grows – I am so envious of you both, I would SO love the opportunity to be able to do something like this. I just have to win the lottery and purchase that mill house my husband is obsessed with – then I’m right on it!! And I love that photo of you with all your wine things 🙂
We started out making wines, first from kits, then tried our hands at making them from scratch. We had some fairly good success. (I even stomped some grapes. Everyone raved at how good that wine was!) We have switched to making brandy. It’s much easier and less involved. But, I do miss stomping grapes.
Great thorough and informative post about wine making. We’ve always wanted to do that. (We only have one grapevine though…)
Well, it’s all a matter of how much that one grapevine produces. We made red wine this year from grapes from one vine — ended up with about 100 lbs of grapes, which became about 30 liters of wine. Don’t think that just because it’s a single vine, it can’t be a great producer 🙂